My First Attempt at Unclogging a Drain Without Calling a Plumber
There’s something uniquely satisfying about solving a household problem on your own. For me, that moment came when I faced my first clogged drain. It wasn’t a dramatic, water-flooding-the-bathroom situation, but it was annoying enough to disrupt my daily routine. The sink in my kitchen was draining slower than a snail on a lazy Sunday, and I knew I had to do something about it.
I’ll admit, my first instinct was to call a plumber. But then I thought, How hard can it be unclogging a drain? Armed with a mix of curiosity, determination, and a little bit of overconfidence, I decided to tackle the problem myself. Here’s how my first attempt at unclogging a drain went, complete with the lessons I learned along the way.
Step 1: Diagnosing the Problem
Before diving in, I wanted to understand what was causing the clog. Was it food debris? Grease buildup? Or something more sinister lurking in the pipes? I started by removing the strainer from the sink and inspecting it. Sure enough, it was covered in gunk—bits of food, grease, and who-knows-what else.
I realized that this was likely just the tip of the iceberg. The real clog was probably deeper in the pipes. But before I went full-on DIY plumber, I decided to try some simple, natural remedies.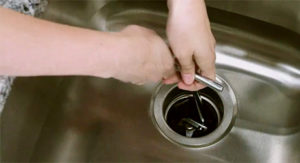
Step 2: The Baking Soda and Vinegar Method
I’d heard about the magical combination of baking soda and vinegar from countless DIY blogs and YouTube videos. It sounded too good to be true—a natural, non-toxic way to clear clogs. I figured it was worth a shot.
Here’s what I did:
- Boiled a kettle of water and poured it down the drain to loosen any grease or debris.
- Poured half a cup of baking soda directly into the drain.
- Added half a cup of white vinegar and quickly covered the drain with a plug or cloth to trap the fizzing reaction.
- Let it sit for 30 minutes, then flushed it with another pot of boiling water.
At first, I was hopeful. The fizzing sound was oddly satisfying, and I could almost imagine the clog dissolving away. But when I tested the drain, the water still drained slowly. It seemed the clog was more stubborn than I thought.
Lesson Learned: Baking soda and vinegar are great for minor clogs and maintenance, but they might not be enough for tougher blockages.
Step 3: The Plunger Approach
Next, I decided to try a plunger. I had one lying around for toilet emergencies, so why not give it a shot? I filled the sink with enough water to cover the plunger’s rubber cup, placed it over the drain, and started plunging vigorously.
At first, nothing happened. But after a few minutes of persistent effort, I heard a glug-glug sound, and the water started draining faster. Success! Or so I thought.
While the plunger did improve the situation, the drain still wasn’t flowing as freely as it should. I realized that the clog was only partially cleared.
Lesson Learned: A plunger can be effective for dislodging clogs, but it might not completely solve the problem if the blockage is deep or solid.
Step 4: Enter the Drain Snake
At this point, I was determined to finish what I started. I’d heard about drain snakes (also called augers) and decided to invest in a basic handheld one from my local hardware store. It was a simple tool—a long, flexible metal coil with a handle—but it looked like it meant business.
Here’s how I used it:
- Removed the sink strainer and inserted the snake into the drain.
- Slowly pushed the snake down the pipe, twisting the handle as I went.
- Felt resistance about halfway down, which I assumed was the clog.
- Twisted and pushed the snake until it broke through the blockage.
- Pulled the snake back out, bringing with it a disgusting mess of hair, grease, and food debris.
It was gross, but it worked! The drain was finally clear, and water flowed freely again.
Lesson Learned: A drain snake is a powerful tool for tackling tough clogs, especially when natural remedies and plungers fall short.
Step 5: Preventing Future Clogs
With the clog cleared, I wanted to make sure I wouldn’t have to deal with this problem again anytime soon. Here are a few preventive measures I’ve adopted:
- Installing a sink strainer to catch food debris before it goes down the drain.
- Avoiding pouring grease down the sink. Instead, I let it cool and dispose of it in the trash.
- Flushing the drain weekly with hot water and a bit of dish soap to keep it clean.
- Using baking soda and vinegar monthly as a maintenance routine.
Final Thoughts
Looking back, my first attempt at unclogging a drain was a mix of trial and error, frustration, and eventual triumph. I learned that while natural remedies and plungers can be helpful, sometimes you need the right tool for the job—like a drain snake.
More importantly, I gained confidence in my ability to handle minor plumbing issues without calling a professional. It’s empowering to know that I can solve problems around the house, and it’s saved me money in the process.
If you’re facing a clogged drain, I encourage you to give DIY a try. Start with the simple solutions, and don’t be afraid to get your hands dirty (or invest in a drain snake). You might just surprise yourself with what you can accomplish! If unclogging a drain feels a little beyond your scope, Option One Plumbing is here to help. Contact us for a free 20 point inspection.